
Internal guide
How to edit the ESC website
Everything you need to manage the website – from signing in to publishing an article. The site runs in four languages and each language is edited separately.
Sign in01
Signing in
You reach the admin area by adding /wp/wp-admin to the website address.
- Open the website address and add /wp/wp-admin at the end.
- Enter the username and password you received from us.
- After signing in, the Edit website dashboard opens automatically.

Forgot your password? Click “Lost your password?” and you will receive a reset e-mail.
02
The Edit website dashboard
The main screen is a map of the website. Each card is one part of the site and the SK / EN / DE / IT buttons open that language version directly.
- Homepage – all homepage sections, photo, hotel logos, social links.
- Hospitality Control – page texts, areas (the expandable items) and pillars.
- Software – page texts and the individual software items.
- Contacts – phone, e-mail, address and billing details.
- Blog – articles and news.
- Legal pages – privacy policy, cookies, terms of use.
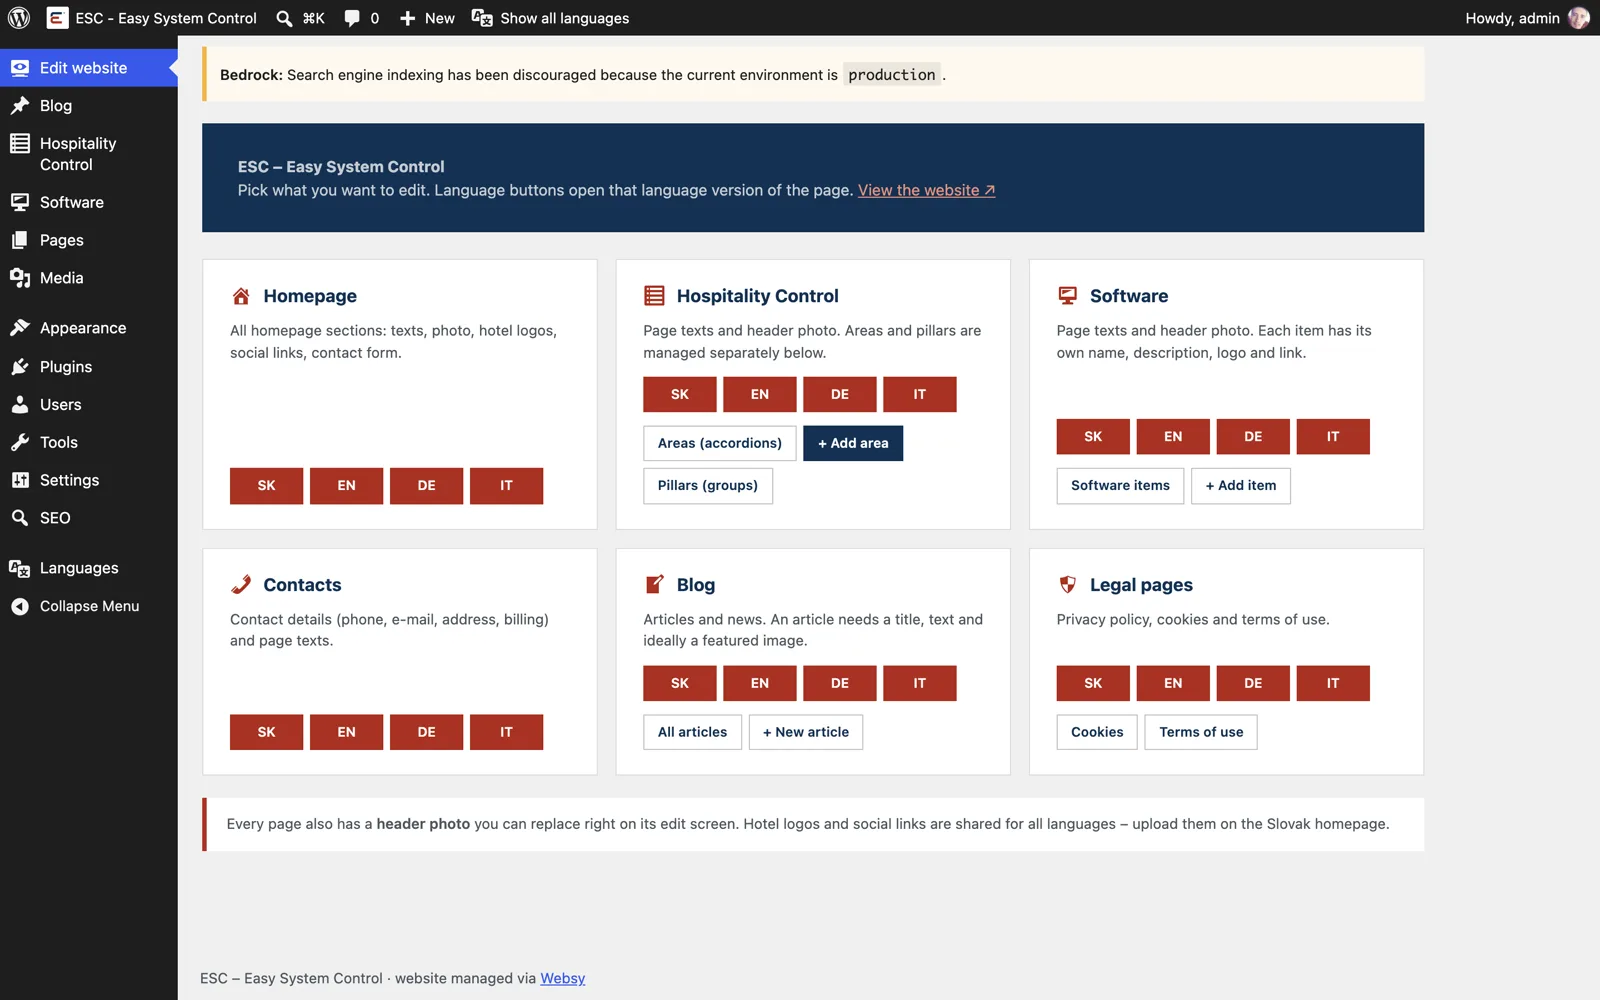
You can always return here by clicking “Edit website” in the left menu.
03
Editing texts
Texts are grouped into numbered boxes in the same order as the sections appear on the page. Nothing to hunt for – you simply go top to bottom.
- On the dashboard, click the language next to the page you want to edit.
- Rewrite the text in the field. Under every label there is a note explaining where the text appears.
- Click the blue Update button in the top right.
- The change is live immediately – check it via View Page.
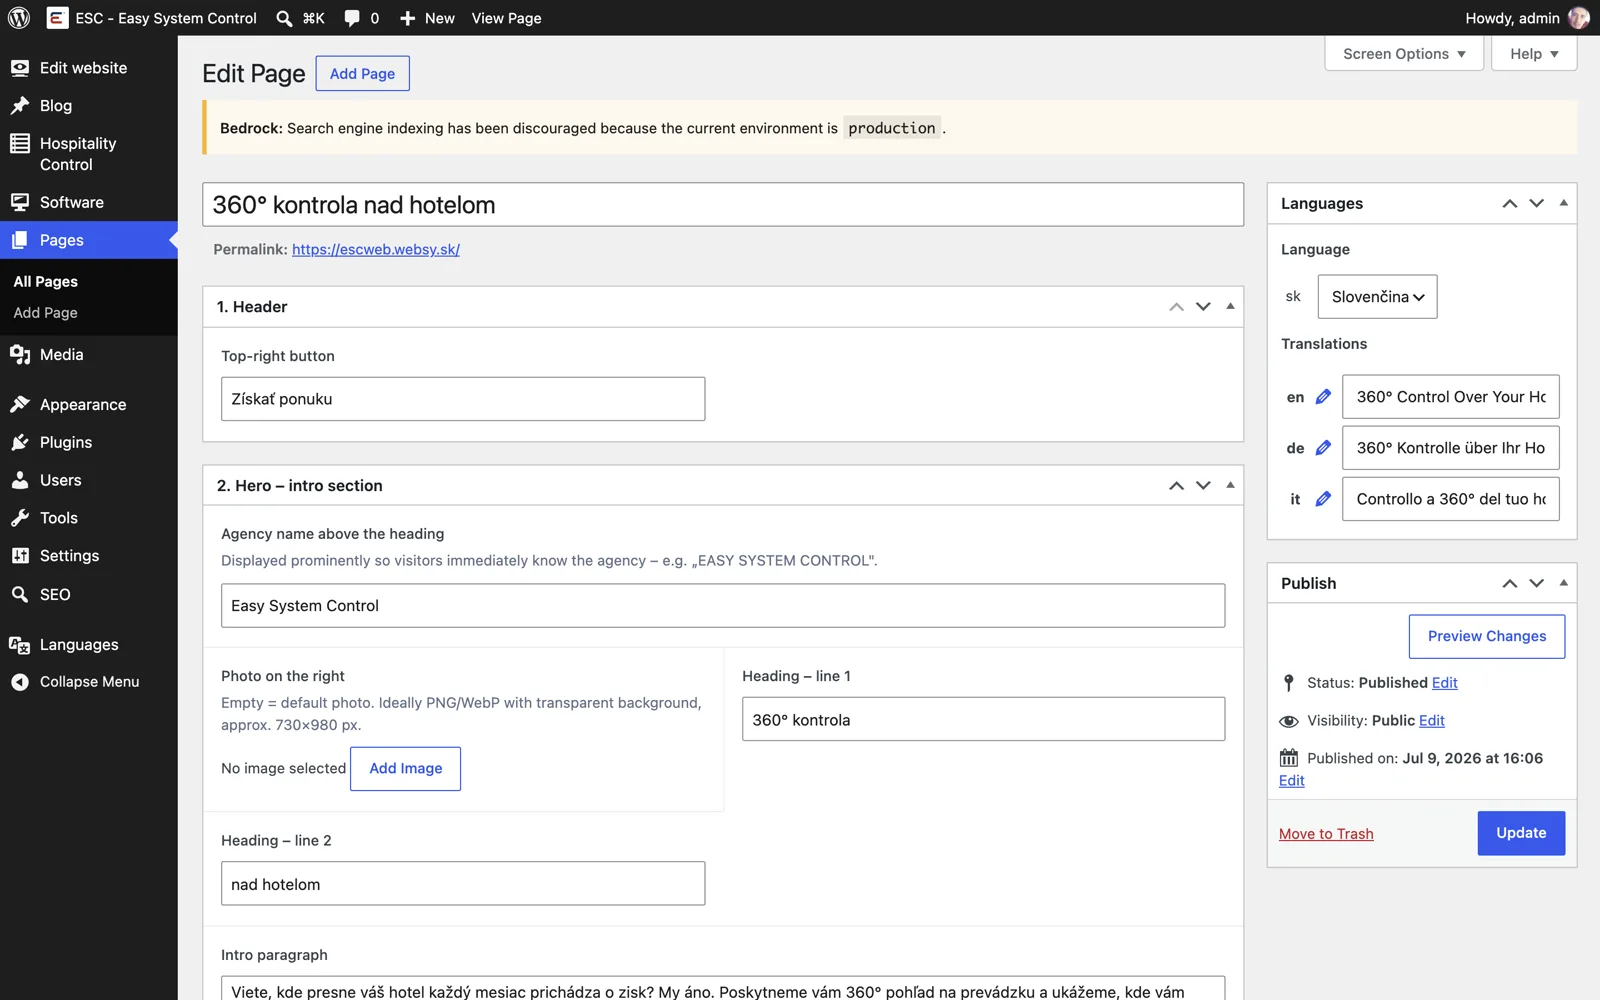
If you leave a field empty, the original text is used. Nothing breaks.
04
Replacing photos
Every page has its own main photo that you can replace without a developer.
- Find the photo field (e.g. Photo on the right or Header photo).
- Click Add Image and upload a file or pick one from the media library.
- Save with Update.
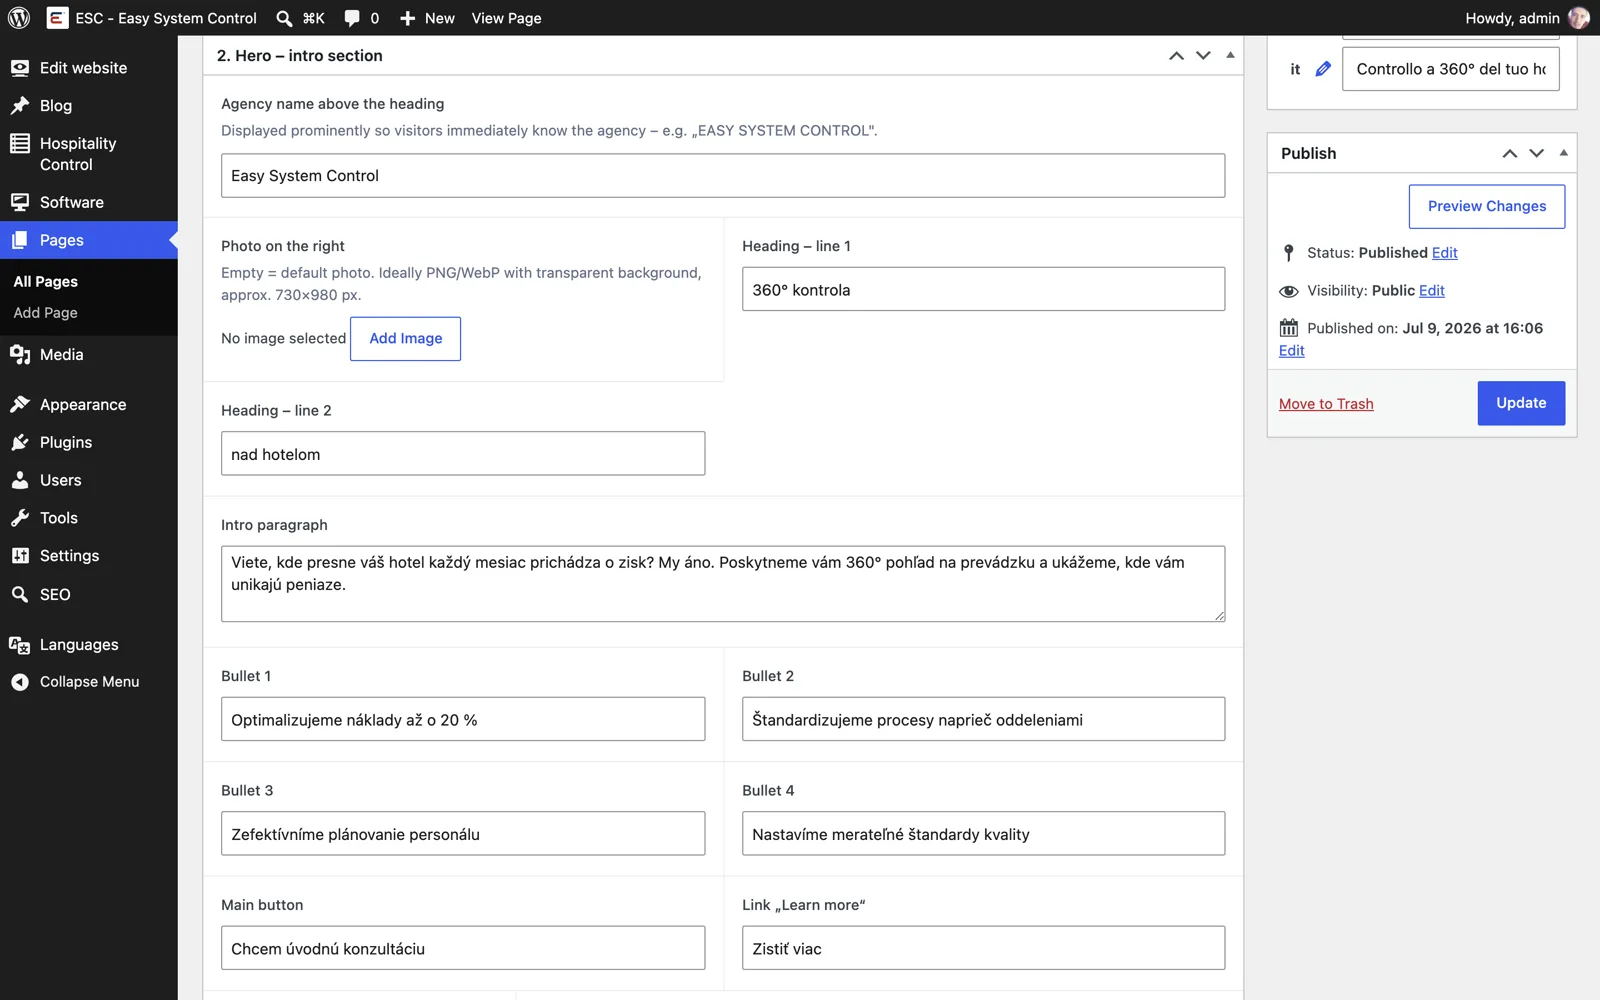
An empty field means our original photo is used. Recommended photo width is at least 1600 px.
05
Hospitality Control areas
Areas are the expandable items on the Hospitality Control page. They also form the submenu in the main navigation.
- Click Hospitality Control in the left menu.
- Click the name of the area you want to edit, or Add area at the top.
- The area title is the heading; the content in the editor is the list that expands.
- In the right column pick the pillar (group) the area belongs to, and its order.
- Save with Update or Publish.

The order is controlled by the Order field in the Page Attributes box. A lower number means higher in the list.
06
Area content
Area content is written as a simple bulleted list. Exactly that list appears when a visitor expands the area.
- Write the text in the large editor in the middle.
- Create a bulleted list with the bullet button in the toolbar above the text.
- Indent a bullet with the Tab key to create a sub-item.
- Save with Update.

Do not paste directly from Word – it carries hidden formatting. Paste with Ctrl+Shift+V (Cmd+Shift+V on Mac).
07
Software items
Every item on the Software page has its own name, description, logo and link.
- Click Software in the left menu.
- Open an existing item or add a new one with Add item.
- Fill in the Short description and the Link – URL.
- Upload the logo via Featured image in the right column.
- Save with Update.

If you leave the link empty, the button simply does not appear. Nothing breaks.
08
Team
The Team page has an introduction about the team and a ready-made space for presenting people. The members section appears on the website by itself once you add the first person.
- Click Team in the left menu, then Add member.
- Write the name as the title and fill in Position and Short description (2–3 sentences).
- Upload the photo with Set photo in the right column (portrait, ideally 800×1000 px).
- Set the order in Page Attributes → Order and save with Publish.
- Edit the introduction about the team on the dashboard, card Team.
Until you add anyone, the page shows only the text about the team – no empty grid is ever displayed.
09
Blog articles
The blog is your space for articles and news. New articles are written in the modern editor.
- Click Blog in the left menu, then Add New Post.
- Write the title and the body of the article.
- Make the main subheadings Heading 2 – the table of contents is generated from them automatically.
- On the right set the Set featured image and a short excerpt.
- Publish with the Publish button.
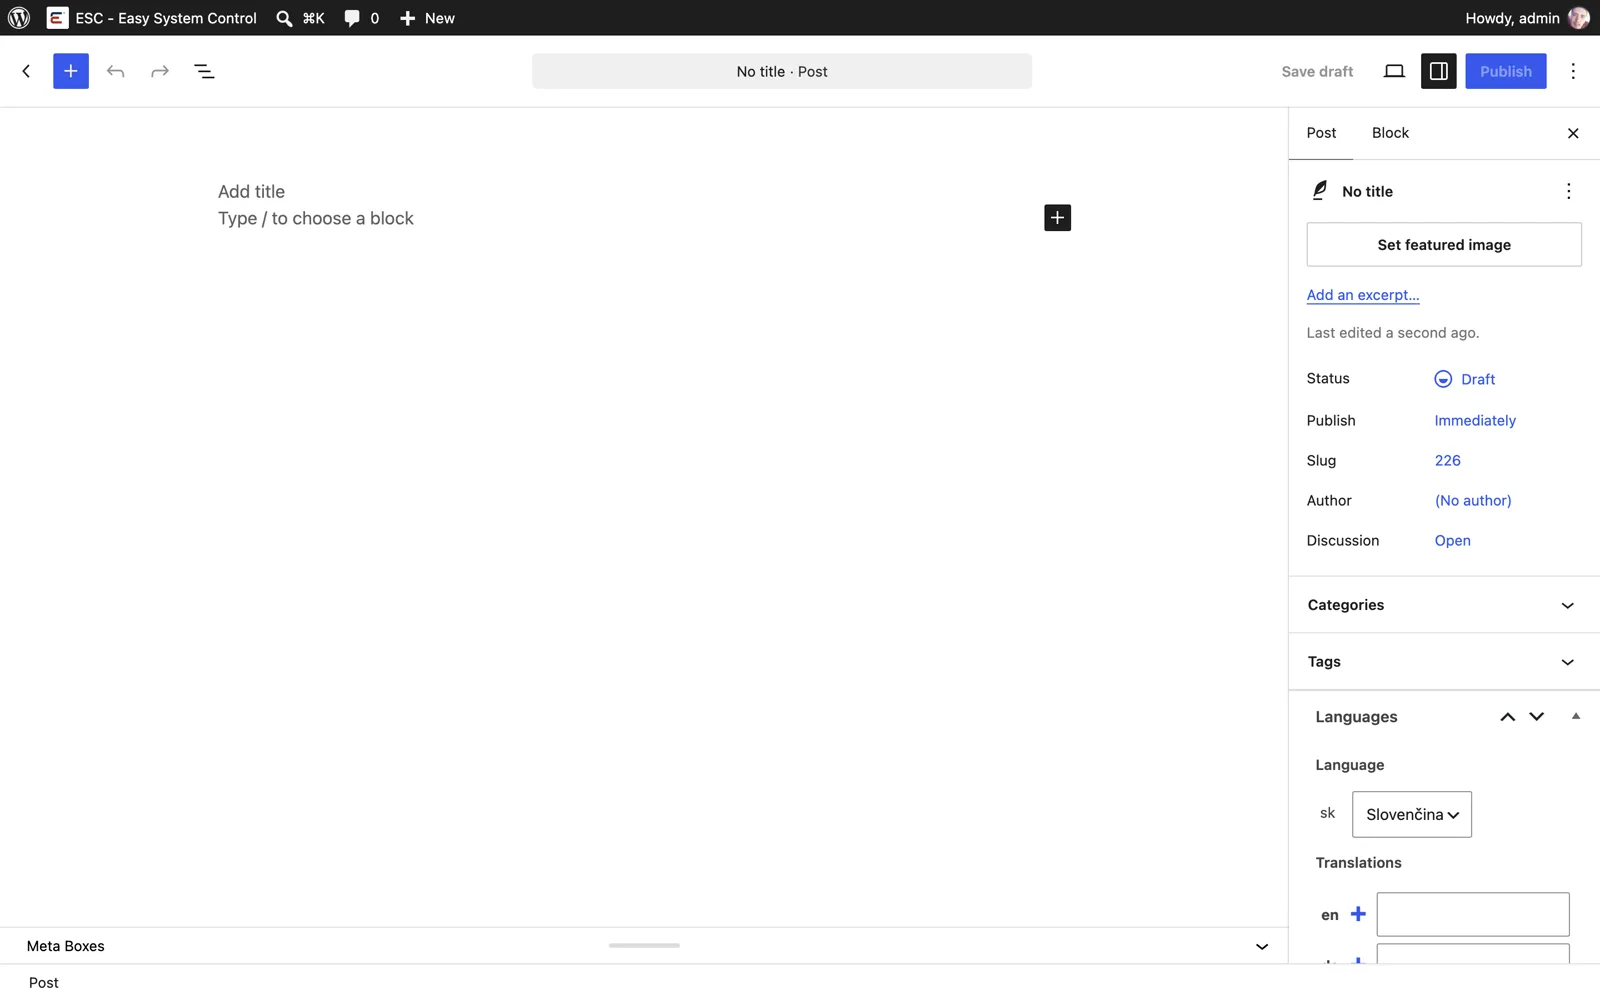
If an article has no photo of its own, the site uses a brand photo so the listing never looks empty.
10
Languages and translations
The website runs in four languages: Slovak, English, German and Italian. Each language has its own content.
- Switch pages and texts with the SK / EN / DE / IT buttons on the dashboard.
- For an article or an area, look for the Languages box in the right column.
- Add a translation by clicking + next to the language.
- If a translation does not exist, the site shows the Slovak version – a visitor never sees an empty page.

Hotel logos, social links and the software logo are shared for all languages – upload them on the Slovak homepage.
Golden rules
- Click Update after every change, otherwise it is not saved.
- An empty field is not an error – the original text or photo is used.
- Upload photos in good quality (at least 1600 px wide), the site resizes them for you.
- Do not change anything under Settings, Plugins and Appearance – those are ours to handle.
- If you are unsure about anything, just ask. One extra question beats an hour of fixing.
Need a hand?
Get in touch and we will help. This guide stays available at this address.
Get an offer